Despite having a nightmare day with the kids I managed to get the batch of vinyl roads finished and put together a howto, try out the magnetic foam roads, get the Helmer units put together and find time to sit down and write this lot up! I’ve still got to log in to work to run some database updates but that can wait 🙂
First up, the vinyl roads.
1. Cut the tile into 40mm side strips and then cut any curves, junctions required. Peel off the paper backing to reveal the adhesive and lay them all out. Then scatter the lot with a mix of fine and medium model railway ballast.
And as you can see, I had a helping hand from my daughter. She insisted and it was easier to say yes!
2. To make sure the ballast is well fixed, use a spare spray can as a roller and make sure it’s all well stuck. Don’t press too hard though as the ballast seems to ‘powder’ under heavy pressure!
3. Once it’s had a little time to dry in, adjourn to a suitably open space…
…and spray the lot with Army Painter Leather Brown
4. I’d intended taking a pre and post grass picture but didn’t have the camera to hand during the first session but basically, a good dry brush with my mid-brown and then a top brush with a cream/off-white. And then PVA and my standard static grass to give it some contrast.
I’d decided to add some bits of bush but I’m not sure it’s necessary and may make storage a but harder as they’ll not stack as well
5. Finally I sprayed the lot with matt varnish. I’ll likely try the PVA mix other people have suggested on the next batch of scenery.
Overall, quite pleased with them. Not sure how they’ll hold up to regular use, but that’s unlikely to be an issue with the number of games I play!
Following the suggestions of a few people on other forums/blogs I picked up some magnetic backed grey foam sheets. This was to use as modern tarmac roads. The easy option is to just cut it into strips and use as is. But that’s too easy for me! So, I’ve tried to add a verge (no grass on yet) and some white lines. These latter were problematic. I used a white gel pen and it doesn’t take too well to the foam, but not too bad though. It would also have helped if I’d got the lines in the right place!
This gives a view of the thickness of the foam. Although the magnetic basing adds to the thickness, it also makes it more robust and the added weight helps hold it on place.
I was almost tempted by the idea of coating my boards with sheet metal as then the roads would ‘stick’ in place! Again, I’m not sure on how tough the foam will be but it should be OK. And for 49p a sheet it’s a bargain! These roads are 35mm wide. I may still do the main batch in 30mm wide. And I also need to look into what the correct road markings should be!
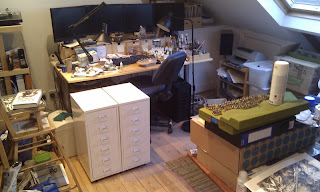
And finally, to conclude this lengthy Sunday night post, I made up the Ikea HELMER drawer units. Given the amount of thin steel and sharp edges involved I only managed to draw blood once! They are a great little find (£20 each). I’m going to line each drawer with a non-lip sheet, and maybe make up some compartments to separate stuff. It would also be useful to have some holed ‘panels’ to store Vallejo pots upside down. I think this may help the issue I have of the ‘dropper’ drying out and blocking up.
As you can see, the desk is a little cluttered
The plan is to move the two units under the left side of the desk
So there we have it. Some progress of sorts. I now need to decide how many credits I can claim for the various roads pieces?


Cracking!! They look really good. great article
Cheers
Paul
Fantastic stuff! I need some of these.
On the subject of the nozzles clogging up, I have an old darning needle that I keep specifically for unblocking duty. Works fine and the wife hasn't found out…yet.
Either that or take the nozzle out of the paint -a pair of pliers with just a gentle grip normally shifts them- give them a wash out with some detergent and Rob's your sis's sibling.
Itching to have a go at then roads. Look the mutts nads.
Top work Andy. The roads look fantastic.